This is a very very long article on Logic Pro learning, based on The “Music Production” course on Coursera. Six sections will be included as listed:
- Connector and Cables
- Basic Editing in Logic Pro X
- Automation in Logic Pro X
- Dynamic Processors
- Configurating EQ
- Understanding Synthesizer
Chapter 1: Connector and Cables
Be aware of the importance about cables and connectors because quality of cables could prevent us from getting noisy voice. many sound malfunction are caused by broken connectors or cables.
TS cable
It’s also known as “instrument cable”. But what’s TS?
The connector of the TS cable is cylindrical in shape, typically with two, three or four contacts. Three-contact versions are known as TRS connectors, where T stands for “tip”, R stands for “ring” and S stands for “sleeve”. Similarly, two and four-contact versions are called TS and TRRS connectors respectively.
The connector was invented for use in telephone switchboards in the 19th century and is still widely used. In its original configuration, the outside diameter of the “sleeve” conductor is 1⁄4 inch (exactly 6.35 mm). The “mini” connector has a diameter of 3.5 mm (approx. 1⁄8 inch) and the “sub-mini” connector has a diameter of 2.5 mm (approx. 3⁄32 inch).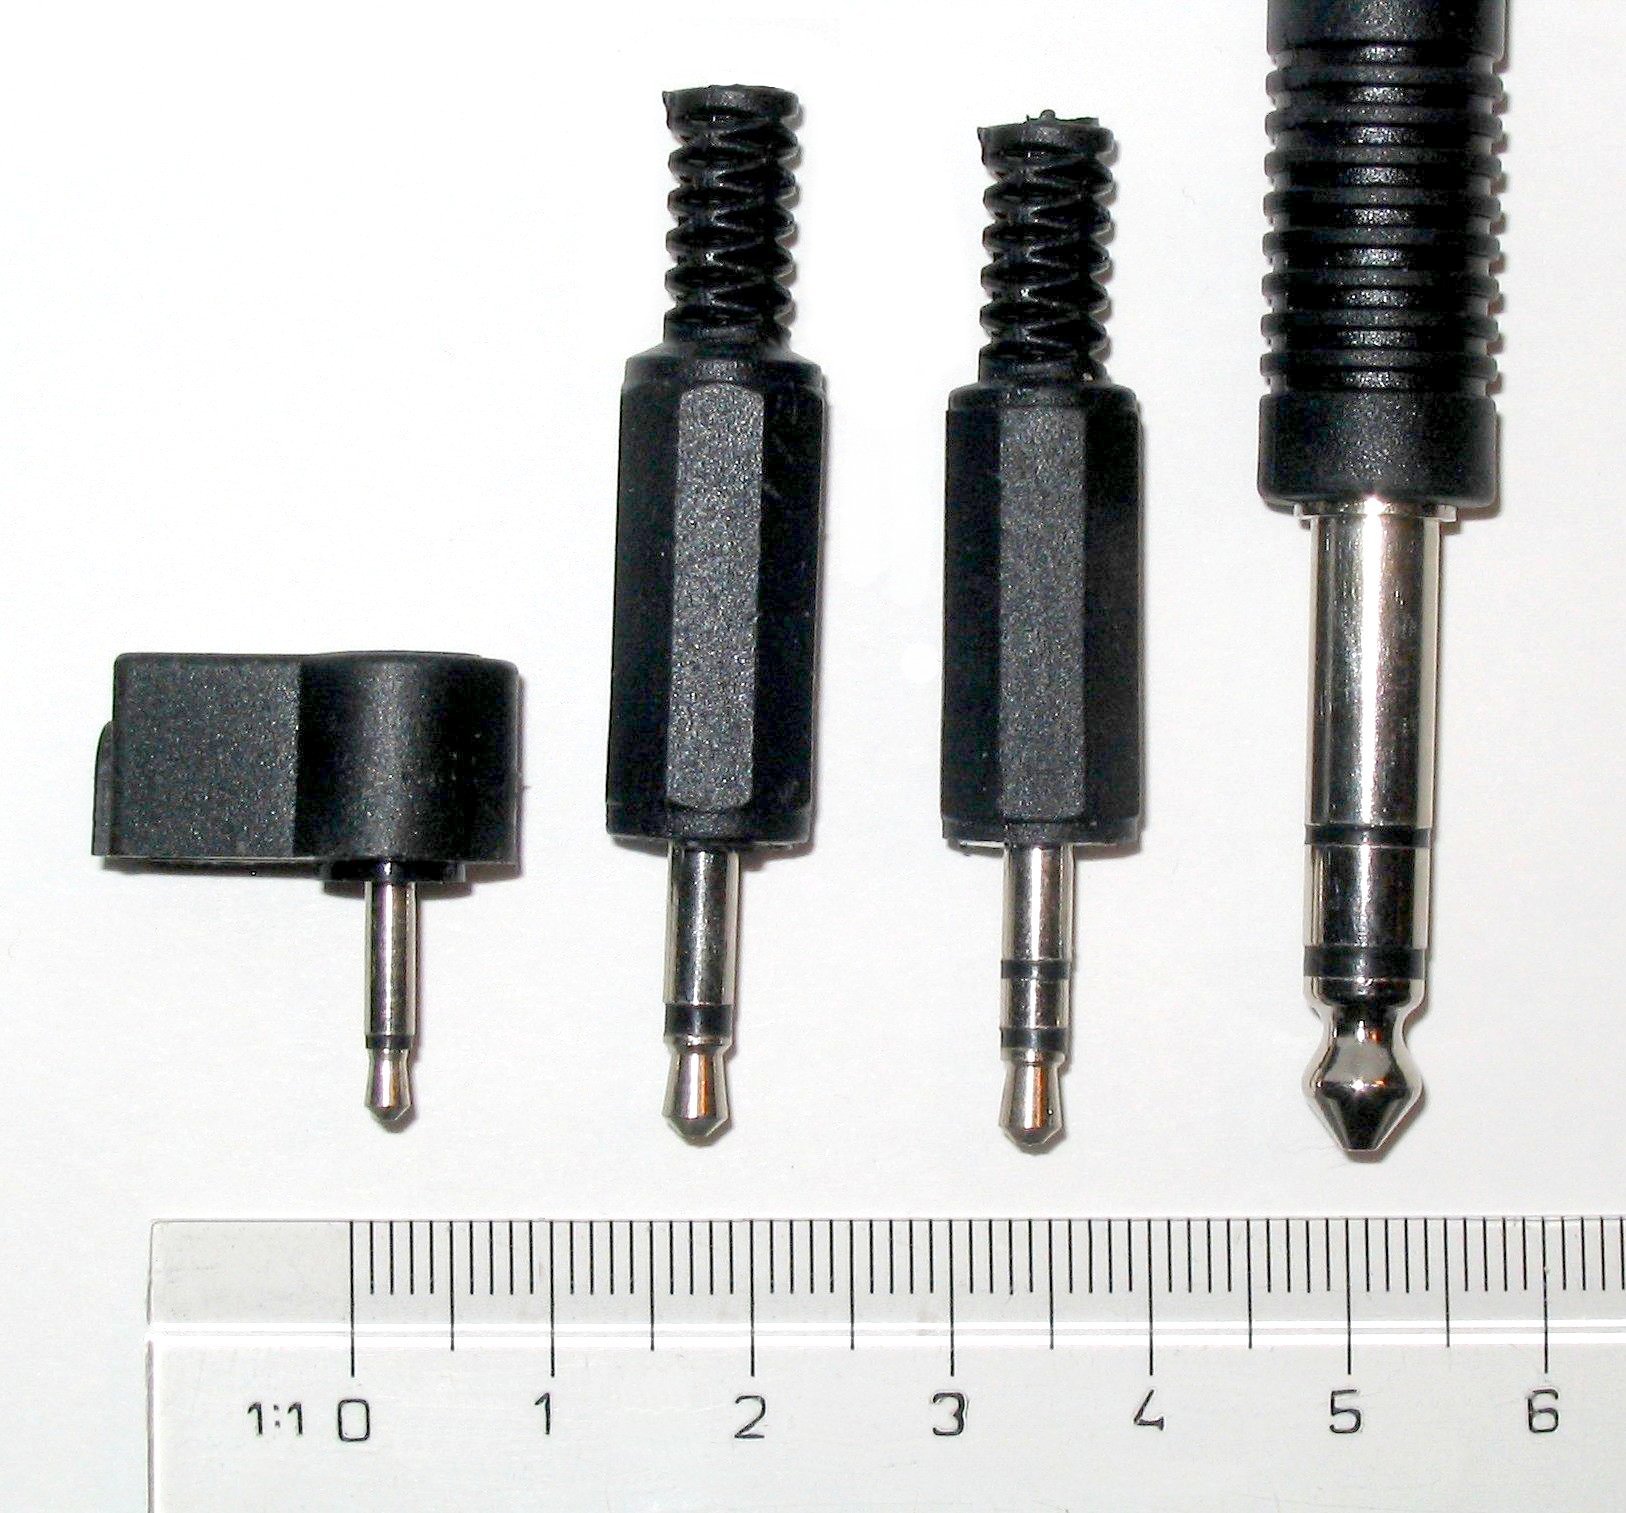
Common usage example: connect gears to amplifier or DI.
XLR cable
XLR cable is a standard Microphone cables. And it’s also a balanced cable.

The XLR connector is a style of electrical connector, primarily found on professional audio, video, and stage lighting equipment. The connectors are circular in design and have between 3 and 7 pins. They are most commonly associated with balanced audio interconnection.

The following tables show usage of each pin.
| Pin | Function |
|---|---|
| 1 | Chassis ground (cable shield) |
| 2 | Positive polarity terminal for balanced audio circuits (aka “hot”) |
| 3 | Negative polarity terminal for balanced circuits (aka “cold”) |
RCA cable
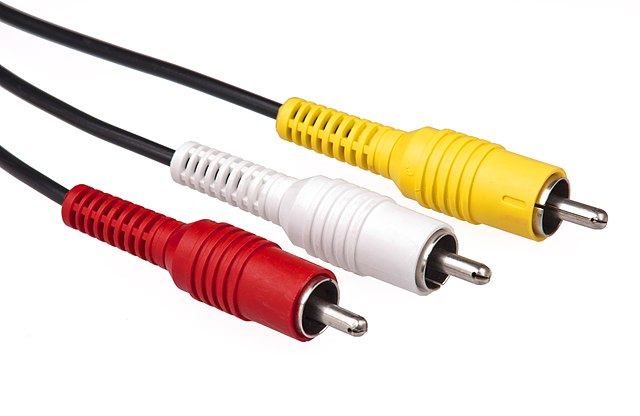
RCA cable is initially designed for composite video (yellow) and stereo audio (white and red). In music production, they are mainly used to connect consumer grade appliances.
The name “RCA” derives from the Radio Corporation of America, which introduced the design by the early 1940s for internal connection of the pickup to the chassis in home radio-phonograph consoles.
Balanced / Unbalanced cable
We talk about balance and unbalance in above sections. In telecommunications and professional audio, a balanced line or balanced signal pair is a transmission line consisting of two conductors of the same type, each of which have equal impedances along their lengths and equal impedances to ground and to other circuits. The chief advantage of the balanced line format is good rejection of external noise when fed to a differential amplifier.
Chapter 1: Reflection
We talk about TS cable, which connect gears to amplifier or DI; XLR cable, which mainly connect microphone; RCA cables, which connect consumer grade appliance. And we also talk about balanced cable and it’s advantage of rejecting noices.
It’s interesting to know more detail about cables, since our instructor Prof. Loudon emphasise connector and cables are important and I also have similar experiences when playing with my gears. Beside reviewing some knowledge in class material, I also find something interesting stuffs such as pin function.
Finally, thank you for reading this post and I will be really appreciate if you could post your feedback and help me improve!
References
Balanced cable http://en.wikipedia.org/wiki/Balanced
XLR connector http://en.wikipedia.org/wiki/Xlr_cable
RCA cables http://en.wikipedia.org/wiki/Rca_cable
Chapter 2: Basic Editing in Logic Pro X
This section will cover how to perform important editing tasks in your DAW including: trim, separate, crossfade, merge, grid, cycle, markers, zoom, name and color.
My DAW is Logic Pro X. Maybe you are using a different DAW, but I believe operation would be similar (or, to some extent) for other DAW. Before starting this lesson, I would like to express my favour to using shortcut keys. They could greatly improve efficiency. And I wish you could feel its power during this lesson.
Trimming
There’s no Trim shortcut keys. Here is how we do a basic triming by mouse.
- Select a single region
- Move the mouse to the edge of the region
- Drag mouse to trim
- Note if you are going to the up-right corner of the last region of a track, you will create a loop of this region
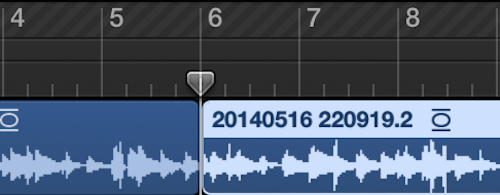
Separate (Split)
In Logic Pro, “Separate” is called “Split”. Here is how we do a basic spliting.
- Select a single region
- move the playhead to the place we like to split
- split region by
⌘T
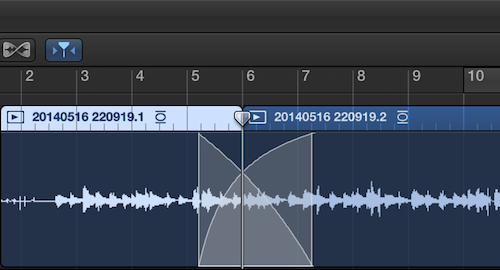
Crossfade
This is going to show how to create crossfade for 2 adjacent blocks.
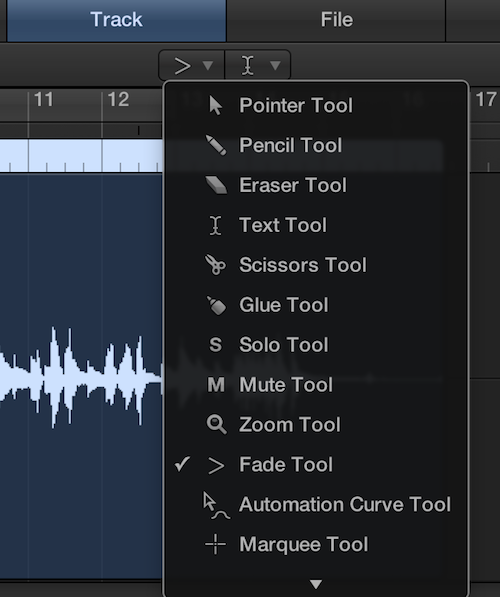
- Show the “Edit” View by
E - Select the “Fade tool” (only available by mouse) in the “left click tool”
- Drag an region between the two tracks to create crossfade
- Manipulate the crossfade curves to get preferable effects
Merge
In Logic Pro, one kind of “Merge” are called “Convert to File”
- Select multiple regions by pressing
⇧(Shift) - convert selected region by
⌥⌘F

Grid
- Show/Hide Grid lines by
⌃G - Slightly move region by dragging region with mouse and holding
⌃
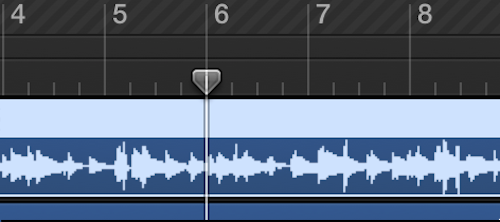
Cycle
Here’s how we do to repeatly playing a region.
- Press
Cto switch “Cycle” Mode - Then goto the top of the track, create a cycle region (yellow region in the screenshot) by dragging mouse
- Cycle region is also control by Grid, so we could pressing
⌃to adjust cycle region length.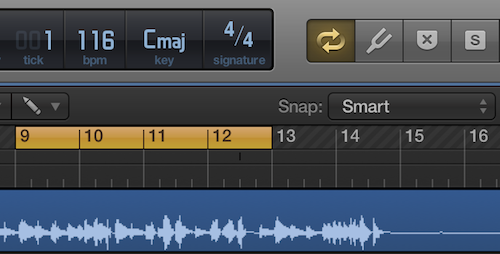
Then we could place the playhead to in the middle of the region and hit space to play this region repeatly and to optimize it.
Zoom
There is 2 types of Zoom in Logic Pro – Horizontal and Vertical. Here’s the basic zooming techniques.
- As our instrutor said, select the track before zooming
- Horizonal Zoom in / out by
⌘ ← / → - Vertical Zoom in / out by
⌘ ↑ / ↓ - After zooming, the playhead will remain the same position on the screen if possible.
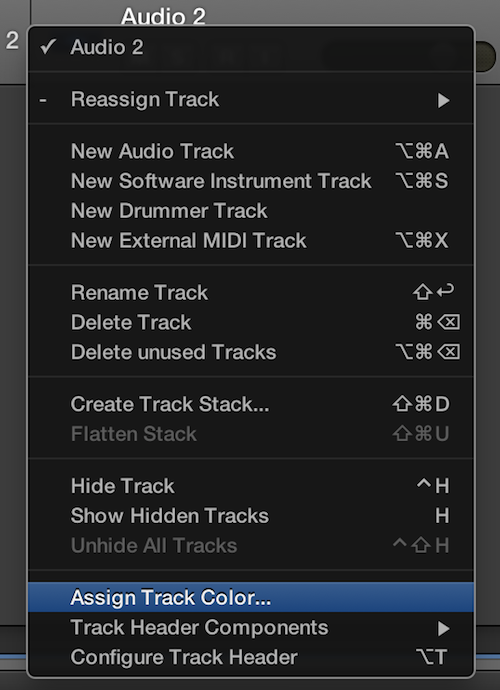
Name and Color
Naming / coloring a track is good habit. Especially if a pattern is formed, good naming could help you better manage the music project, and coloring could help you identify tracks visually.
- Name the track by double click the track name
- Color the track by goto the track number, popup menu by right click, then click “Assgin Track Color”
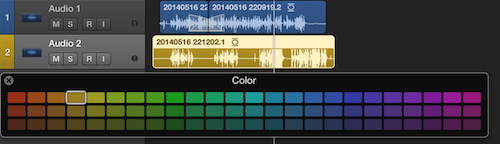
- Name / Color Region by track by
⇧⌥N/⇧⌥C - Show / Hide color palette by
⌥ C
Other tips
- Navigating by keyboard will also greatly improve efficiency.
- use
/{number}to navigate to No.{number} bar
- use
- Hit
Spaceto start or pause playing - Final weapon for key command: Logic Pro X key commands. I highly encourage people go there and search any term they are interested in. There is always surprice to encounter useful features.
Chapter 2 Reflection
We introduced some important editing approach in this lesson, most of them could be handled by using keyboard shortcut. Maybe occupational disease for a programmer, I really feel keyboard is my best friend :). Wish this help.
Finally, thank you for reading this post and I will be really appreciate if you could post your feedback and help me improve!
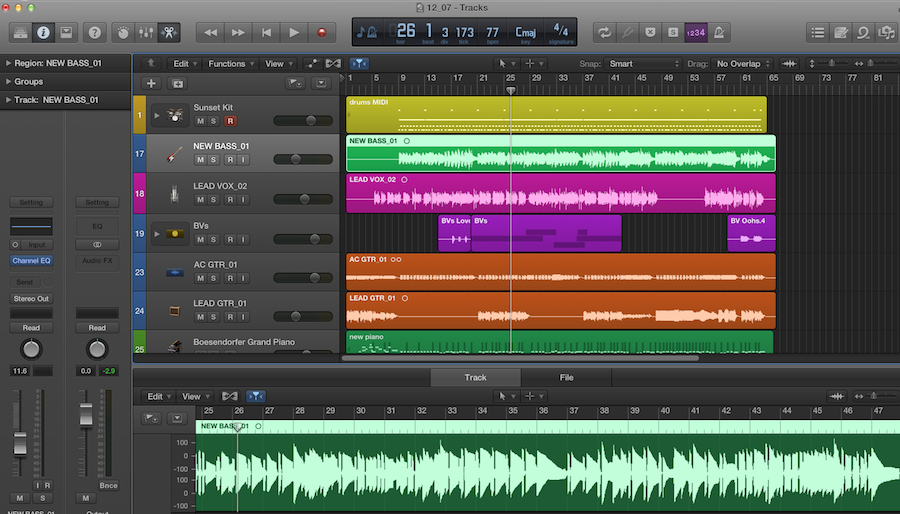
Chapter 3: Automation in Logic Pro X
Recording automation
- First, select a track for adding automation. (In our case, track LEAD VOX_02)
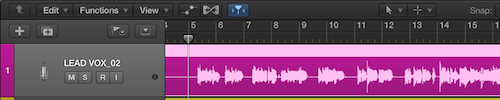
- Press
Ato enable automation view. we can see the automation icon become yellow.
- Then select type of automation, (In our case, Volume,) And add control point by double click
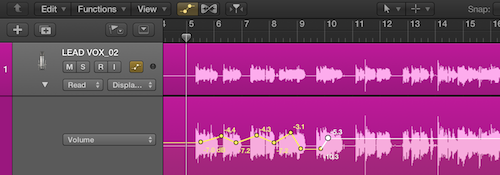
Editing automation
- We can also add other type of automation (such as Pan) and all automation in a track will be applied to the track.
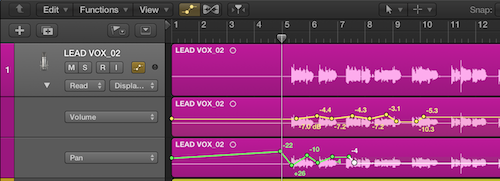
- Double click to add/remove automation control point
- We could use pencil tools to draw the automation by hand
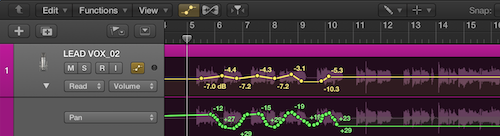
- We could also use erase tools to remove a series of control points.
- Finally, if we turn on the automation display, we could visualize all automation effects on the original tracks. In the screenshot, I set it to Volume, but you could still see the green pan automation line (Notice the background of the original track).

Chapter 3 Reflection
The ability of changing plugin parameters over time make automation a must have skill in musical production.
Chapter 4: Dynamic Processor
In the following lesson, I will describe the concept behind dynamic processors and look at the four basic parameter settings related to them.
Dynamic Processors
Dynamic Processors are post-production effects designed to manipulate the dynamic range of a piece of audio. That is, they affect how many decibels there are between the quietest and loudest levels of the output.
Dynamic Processors can either:
- reduce dynamic range through COMPRESSION, or
- increase dynamic range through EXPANSION
Compression and Expansion
To compress (reduce) the dynamic range of a piece of audio, you can either increase the levels of the quiet parts to make them louder or decrease the levels of the loud parts to make them quieter.
Compressors and limiters fall under this category.
While either method can effectively decrease the dynamic range, a compressor or limiter usually brings down the levels above a certain threshold rather than brings up the levels of the quiet parts. This is called DOWNWARD COMPRESSION and is usually what people are referring to when they talk about “compressors.”
To expand the dynamic range of a piece of audio, you can either decrease the levels of the quiet parts to make them quieter or increase the levels of the loud parts to make them louder.
Expanders and noise gates fall under this category.
Expanders and noise gates usually used to decrease quiet levels. In the case of gates, quiet levels (those that fall below the threshold) are in effect reduced to signal off.
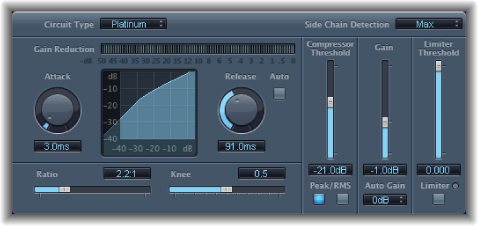
Parameters of Dynamic Processor
Threshold
Threshold refers to the level where the dynamic processor starts to function. If audio crosses over this dB value, the other parameters kick into effect.
Above this dB value in a compressor/limiter, the sound is processed (below it, the signal passes through unchanged.)
Below this dB value in an expander/noise gate the sound is processed (above it, the sound passes through unchanged.)
In other words, a compressor/limiter lowers the volume of a signal when it gets too loud, and an expander/gate lowers the volume of a signal when it gets too quiet.
Ratio
Ratio refers to how much the level is affected once it has crossed the threshold, expressed as INPUT:OUTPUT. The higher the ratio, the more extreme the dynamic processing.
1:1 — for a signal level 1 dB past the threshold, 1dB will be outputted. In other words, nothing changes.
4:1 — for a signal level 4 dB past the threshold, 1dB will be outputted. The output will be one quarter of what goes in. In the case of a compressor, this ratio is considered to be heavy compression.
10:1 — for a signal level 10 dB past the threshold, 1dB will be outputted. In the case of expansion, this ratio or higher is considered to be a noise gate. In the case of compression, this ratio or higher is considered to be a limiter.
30:1 — for a signal level 30 dB past the threshold, 1dB will be outputted. This essentially stops the sound. In the case of compression, this ratio along with low attack and release times is considered to be a BRICK WALL LIMITER.
Attack
Attack refers to how quickly the volume fader kicks in once the signal has crossed the threshold.
This is expressed in milliseconds. The lower the rate, the faster the fader will move.
The attack rate controls how much of the transient will be allowed through unaffected by the processor. The transient is the part of a sound where the amplitude changes a lot in a small amount of time, for example at the head of a drum hit.
Release
Release refers to how quickly the volume fader returns to normal once the signal has crossed back from the threshold.
This is expressed in milliseconds [ms]. The lower the rate, the faster the fader will move.
The ATTACK and RELEASE values are set according to the type of sound and the desired impact. If the source swells in, a longer attack and release could be a good choice. If it the sound itself is “punchy”, a low attack and release could work well. A shorter attack also gives the sound punchiness, whereas a longer attack softens the sound.
In compression a fast attack can stop the transient coming through, but it can also soften the character of the sound somewhat. A longer attack time allows more of the transient through but means there could be a larger volume peak. On the other hand, a noise gate is usually set with a low attack so that the transient comes through, otherwise the sound would swell in.
If the release time is too long, it can result in a “pumping” sound because the processor hasn’t released before the next input comes in.
Chapter 4 Reflection
The ability of dynamic range make it a very powerful tools because it could help removing unwanted signal which is inevitable during recording, or make the signal flow more stable. Thank you for reading this post and I will be really appreciate if you could post your feedback and help me improve!
Chapter 5: Configurating EQ
In this lesson, I am going to demonstrate tunning the EQ of bass track. Let’s get started!
Panel Introduction
First of all, select the bass track and activate channel EQ panel by clicking the “Channel EQ” button in the bass track channel.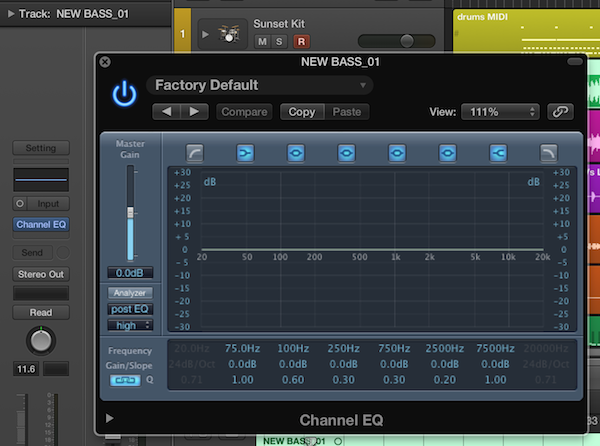
In the panel, we can see:
- Top section
- name of current settings
- compare button (switch to show pre EQ and post EQ effects settings)
- Main section
- on the left panel, master gain level
- on the right panel, there is EQ control switch at different frequency ranges. By default, the lowest and highest end are disabled. Right down the control switch is the EQ preview area. we could also drag the control point in the curve to set parameters. below the preview area, it’s the configuration panel where we accurately set the EQ parameters.
Configuring the Bass track
Here’s what I going to configurate the EQ of Bass:
- Filter signals under 100 Hz & start reduce signals over 520 Hz to put more focus on the bass range
- increase 6dB around 260 Hz (to make sound solid)
- increate 3dB around 730 Hz (to increase noise in strum)
And here’s the final EQ effect after some other minor tunning by comparing the pre EQ and post EQ.
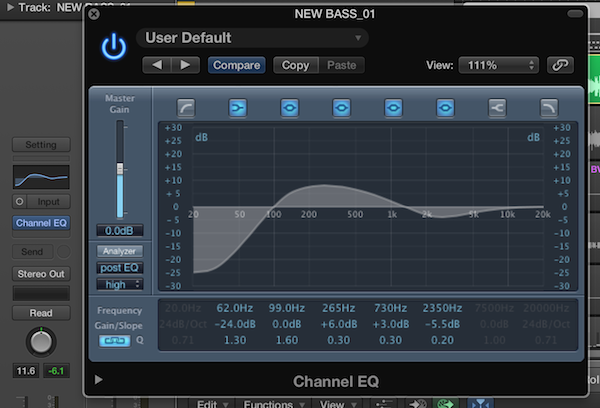
and you could also see the actual EQ curve thumbnail at the bass track channels on the left.
Save as a pre-set
If this setting could be a general one, then we could click the name of setting to save these settings as “bass track EQ”, for example. Or save it as a new default settings, so it could be reused next time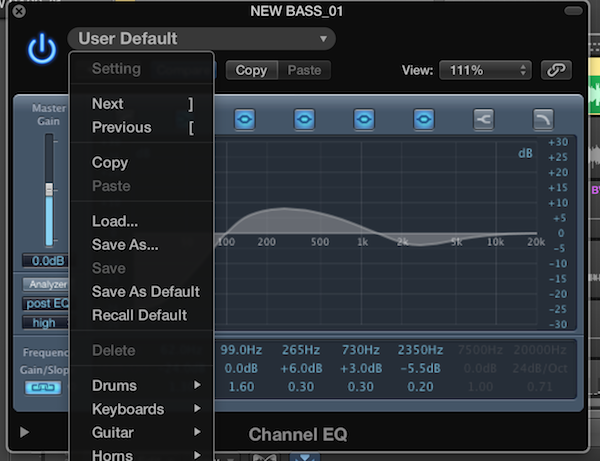
Chapter 5 Reflection
In this lesson we have examined configurating the EQ of a track. It’s very helpful in music production. And it need 2 factors to make this configuration a good one in my opinion:
- Knowing the gear/instrument well. Understanding its basic working range is very helpful on the setting the outline configurations.
- Listen carefully with your ear and trust your instinct in minor configurations.
Chapter 6: Understanding Synthesizer
This note is for week 6 of Introduction To Music Production at Coursera.org. I will be teaching “Explain the usage of 5 most important synthesis module: Oscillator, Filter, Amplifier, Envelope and LFO”.
A sound synthesizer (often abbreviated as “synthesizer” or “synth”) is an electronic musical instrument that generates electric signals which can be converted to sound through loudspeakers or headphones. Synthesizers may either imitate other instruments or generate new timbres. They can be played (controlled) via a variety of different input devices, including keyboards, music sequencers and instrument controllers. And here we will cover modules in a synthesizer.
Definitions:
- Oscillator: A device capable of generating a periodic signal or waveform.
- Filter: A device capable of attenuating a signal at a set cutoff frequency.
- Amplifier: A device capable of boosting a signal amplitude.
- Envelope: The pattern generated from the attack, sustain, decay and release of a sound.
- Low Frequency Oscillator (LFO): A secondary oscillator device designed to produce signals whose frequency is at the bottom of, or below, the audio range.
The Oscillator generates a basic wave (or tone) that is used throughout the synthesis process. Oscillators generate various waveforms: sine, triangle, square, and sawtooth. The sine wave is basically a waveform that is fundamental and has no overtones or partials. The square, triangle, and sawtooth waveforms are capable of producing rich harmonics (partials) to influence the timbre of sound. The oscillator function is to generate a sound for all the other modules in the synthesizer.
After the Oscillator generates the signal it is passed to a filter to remove unwanted partials within a frequency spectrum. This process is called subtractive synthesis because the filter removes unwanted partials. Filters are classified as low pass, high pass and band pass filters. The filter will start functioning when the signal reaches the cutoff frequency.
After filtering, the signal is passed to an amplifier. The amplifier function is to adjust the level or amplitude of the
signal. It also functions as a way to pan the signal from left to right.
The envelope in conjunction with modulation is used to generate a pattern by manipulating the attack, sustain, decay and release of a sound.
LFOs are used to control different parameters or characteristics of a sound in the filter and or amplifier, such as pitch, which many musicians use to explore incredible creativity.
Chapter 6 Reflection
Synthesis is a tool to boost our imagination and creativity when composing electronical music. We talk about the basic of syn but we should be awared that there are different types of systhesis for different instrument and timbre waiting for us to explore. I would suggest ES2 to start with and then select a syn that match one’s need to dive in. For example, UltraBeat for a drummer.
I hope you find this post helpful for review purpose. Thank you for reading this post and I will be really appreciate if you could post your feedback and help me improve.